Showing posts with label Dairy free. Show all posts

Wednesday, August 28, 2013

Banana Bread v2.0


Here is yet another delicious banana bread recipe (the recipe that inspired mine is found here). The first one banana bread recipe I posted a few years back is made with coconut flour. This one is equally as good and healthy, and gluten free of course. My kids go bananas for it (no pun intended!) and would eat all four mini loaves in one sitting if I let them (which I don't, to their utter dismay).

This recipe will make two standard 8x4 inch loaves or 4 mini loaves, which is how I make it. You can sub shredded zucchini for the bananas if you wish (I've made it both ways).

Banana Bread v2.0

Wet ingredients:

3 ripe bananas (or 1 1/2 cups shredded zucchini)
4 eggs
1/3 cup melted coconut oil
1/4 cup unsweetened applesauce
1 teaspoon vanilla
20-30 drops liquid stevia

Dry ingredients:
1 cup sprouted brown rice flour
1 cup almond flour
1/2 cup sucanat or coconut palm sugar
1/4 cup shredded coconut
1 teaspoon baking soda
1 teaspoon cinnamon
pinch salt

1/4 cup dark chocolate chips (optional)

Preheat oven to 350 degrees. Grease two 8x4 inch loaf pans or 4 mini loaf pans with coconut oil.

In a large bowl, mash bananas with a fork until almost smooth. Add eggs and whisk. Add remaining wet ingredients and stir to combine.

In a separate bowl, mix all dry ingredients. Once mixed, add to wet ingredients and stir to combine. Add chocolate chips is using and stir once more to incorporate.

Pour batter into prepared loaf pans and bake for 45 minutes or until a toothpick inserted comes out clean. Let rest in the pans for about 15 minutes before removing and slicing.

Thursday, July 18, 2013

Raspberry Kombucha


We are loving our kombucha around here. My kids ask for their "juice" day and night. I love that they're getting a good dose of probiotics when they drink this, and I usually serve it up at mealtimes. I've been brewing now for about a year and am truly amazed at how easy it is to make and how cost effective! (If you've ever bought kombucha at the health food store, you know it is not cheap!) I've given several scobies out to friends and family and by now there is a hand written instruction sheet floating around somewhere... so it's high time this recipe made it to my blog.

If you are brewing for the first time, ask around for someone to share a scoby with you. If you can't find one locally, you can order one online here. Once you start brewing, you'll notice that your scoby will grow a pancake (an extra layer) with each 2-3 batches. You can simply peel this extra pancake off and then do your own sharing, also known as spreading the kombucha love.

Raspberry Kombucha

1 kombucha scoby + 1/2 cup reserved kombucha tea from previous batch (ask around and see if a friend or someone in your area will share with you if this is your first time brewing kombucha)

1 gallon water
1 cup organic sugar
6 organic tea bags (I use 3 green tea bags and 3 black tea bags)
1/2 cup frozen raspberries

Bring 4-6 cups of water to boil. Once boiling, add the tea bags, turn off the heat, and cover the pot. Set timer for 10-15 minutes. Once the timer goes off, remove tea bags, squeeze any remaining tea out of the bags, and discard tea bags.

Pour sugar into brewed tea and stir to completely dissolve.

Leave sweetened tea out at room temperature until the temperature drops to 80 degrees or lower. (This will take several hours if you leave the sweetened tea in the pot. I brew my tea up at night, then let it cool while I sleep and finish the process in the morning.)

Once the sweetened tea has cooled, pour into a gallon size, wide mouth glass jar. Add the kombucha scoby and 1/2 cup reserved kombucha tea. Fill the rest of the jar with water.

Cover jar with cheescloth or light towel and secure with a rubber band to keep it tight around the top. Let set undisturbed at room temperature for 7-10 days.

On day 7, check kombucha to see if it's ready to bottle. Stick a straw below the scoby and suck a little bit of kombucha out. If it's too sweet, let it hang out at room temperature for 1-3 more days (checking each day). If too vinegary, bottle right away and lessen the time the kombucha ferments on your next batch. If just right, the kombucha should be slightly fizzy- not too sweet- not too vinegary.

Now your kombucha is ready to drink as is or bottle. I like to bottle and get a second fermentation; this is where the kombucha will get nice and carbonated (and even a tad sweeter) from the raspberries.

If you decide not to second fermentation, simply remove the scoby and 1/2 cup of liquid and set aside for your next batch. Then pour into bottles or jars of choice and place in the refrigerator.

If you are going to do the second fermentation, remove the scoby and 1/2 cup of liquid and set aside for your next batch. Then pour the remaining kombucha into bottles or jars of choice, leaving about 1/2 inch at the top of each bottle or jar. For 16 ounce jars, add about 4 raspberries. Use this ratio of ounce liquid to raspberries for whatever size your bottling jars happen to be. Screw bottles or jars tightly with caps and let kombucha ferment for an additional 2-3 days (or up to a whole week).

Wednesday, October 31, 2012

Chocolate Cupcakes (with Beets)


I have young ones, and don't all young ones love cupcakes? Well, mine do at least. They've been asking me to make cupcakes for a while now, and happily, I obliged them with this healthful version of the iconic kids dessert.

This recipe brings me back to the Deceptively Delicious days, when I was putting pureed veggies into nearly everything I cooked. I'm out of that phase now, mostly because I currently don't have any babies eating pureed foods. My focus now is on getting my children to eat veggies- whole- and this proud mama must say that they are really good veggie eaters. (Of course some days they still refuse, but I keep trying!)

But with these cupcakes, there's no need to coerce anyone to eat their veggies, as you can't even tell they're in here. The beet puree lends these cakes to their nice moist consistency (and added nutritional value). As noted, you can also use a squash or pumpkin puree in its place, or a combination of any of the three, without notice to the overall taste.

Cupcakes they may be, but indulge my friends, completely guilt-free, as these babies are so good for you!

Chocolate Cupcakes (with Beets)

Wet ingredients:
1 1/4 cups beet, squash, or pumpkin puree (or a combination of these)
1 cup dates, pitted
1/2 cup coconut oil, melted
4 eggs
1 tablespoon apple cider vinegar
1 teaspoon vanilla


Dry ingredients:
1/2 cup coconut flour
1/2 cup cocoa powder
1 teaspoon baking soda
1/4 teaspoon stevia powder
pinch salt

Preheat oven to 350 degrees. Line a 12 cup muffin tin with paper or silicone liners.

Add all wet ingredients in the order listed in a Vitamix or other high powered blender. Blend until completely smooth.

In a bowl, combine all dry ingredients. Add blended wet ingredients and stir to combine.

Pour mixture prepared muffin tin. Bake for 30 minutes, until a toothpick inserted into a cupcake comes out clean. Let set for 15-30 minutes before eating.


Tuesday, August 14, 2012

Slow Cooker Marinara from Fresh Tomatoes


If you're wondering what to do with all those tomatoes that are rapidly coming into season, this recipe is for you. I am thrilled at how easy and delicious it is. Very little effort is required and the result is a tantalizing marinara that is unbelievable rich.

The uses for this marinara are plentiful. Serve it over brown rice pasta for a traditional take, or do as I do and serve it over grated zucchini for a take on "raw" pasta. It's also great for topping over chicken, spicy chicken sausage, or fresh white fish. It even makes a great dip for vegetables.

Slow Cooker Marinara from Fresh Tomatoes

18-20 roma tomatoes, washed and quartered
1 medium yellow onion
3-4 garlic cloves
2 tablespoons extra virgin olive oil
1 tablespoon balsamic vinegar
1 tablespoon agave nectar
1 teaspoon dried basil
salt, pepper

Place roma tomatoes in a large slow cooker. Chop onion and mince garlic and add to tomatoes. Drizzle oil, vinegar, and agave over tomatoes. Add seasonings and stir.

Turn on lowest setting and cook for about 4 hours. About halfway through cooking time, mash mixture with a potato masher to break up the tomatoes, then stir before putting the lid back on.

This marinara really cooks down, so if you're feeding a crowd, double the recipe. You can always freeze leftovers.

As a side note, I left my marinara really chunky, the way it gets from mashing with the potato masher. If you like a smoother marinara, by all means take an immersion blender to it or blend in a high powered blender for a bit until it reaches the desired consistency. My husband does not like chunky tomatoes, so if he would have been home for this dinner, I would have pureed it a bit before pouring over zucchini.


Sunday, March 25, 2012

Warm Sweet Potato and Kale Salad

I've been rather uninspired in the cooking department lately. I literally sat outside for 25 minutes today thinking of what to make for dinner, and nothing came to mind.

Nothing.

This is not like me. Maybe it's the season, or the weather, or the fact that I haven't had any inspiring fresh produce the last few days... I'm really not sure. But nonetheless, we had to eat dinner, so I had to think of something...

So I went into my pantry and started foraging for dinner ingredients. My eyes landed on the sweet potatoes, which I love. But I didn't want to just fix them in the same old boring way (even as delicious as this boring way is): roasted wedges. I wanted to turn them into a delicious salad, a warm salad, the perfect kind of salad for spring weather.

Finally, inspiration! This recipe just sort of came to life, and I decided it needed to be documented on this blog, especially considering I may find myself in a un-inspirational mood in the not-so-distant-future.

With it's delicious blend of spicy (thanks, ginger) and sweet (thanks, sweet potatoes and cinnamon), this salad will knock you off your feet. I'm especially fond of how the cooked sweet potatoes lightly "cook" the baby kales to take off their raw edge and make them all yummy and soft.

Hopefully it will please your palate as much as it did mine.

Warm Sweet Potato and Kale Salad

Salad:
2 medium sweet potatoes
4 cups baby kales (or spinach, or torn swiss chard)
1 Granny Smith apple

Dressing:
1 tablespoon minced fresh ginger
1 minced clove garlic
1 1/2 tablespoons apple cider vinegar (ACV)
1/2 teaspoon cinnamon
10 drops liquid stevia
salt, pepper
1/4 cup extra virgin olive oil (EVOO)

Chop sweet potatoes into bite sized pieces and place in medium pot. Cover sweet potatoes with water and bring to a boil. Turn heat to medium-low and gently boil for about 10 minutes.

Meanwhile, place baby kales in a large bowl. Chop Granny Smith apple and add to baby kales.

Mix all dressing ingredients (ginger through salt and pepper) in a small bowl. Slowly stream in the EVOO until emulsified.

When the sweet potatoes are done, drain and immediately place on top of the baby kales and apple. Let rest for a few minutes, until the warm sweet potatoes turn the baby kales bright green and semi-wilted.

Add the dressing and toss to coat.


Monday, February 27, 2012

Chile Spiced Seeds

It's time to post another high protein snack recipe. I'm finding myself in a snack rut these days. Now that I'm home with my kids full-time, I am on snack duty three times a day (at least). I let my kids choose their snack of choice (with some wise counsel, of course), and they are really good about incorporating some kind of vegetable or fruit and protein with each snack. I often find myself making a different snack for me as they prefer fruit to veggies (shocker, I know) and I try to limit my fruit intake much more so than is necessary for a child. And these days I am in major need of protein; my body just craves it.

So what do you do when you get sick and tired of celery with almond butter or grain free granola? Toast some spiced seeds!

Chile Spiced Seeds

1 tablespoon extra virgin olive oil
1/4 cup pumpkin seeds
1/4 cup sunflower seeds
1 teaspoon chile powder
1/2 teaspoon cumin
pinch salt

Heat oil in a medium skillet over medium-low heat. Add seeds and spices; stir to coat. Cook for approximately 5 minutes, shaking the skillet frequently to move the seeds around and prevent burning. Pull skillet off the heat once the seeds start making a popping sound. Let cool and enjoy by the mouthful.

Thursday, February 9, 2012

Indian Spiced Chickpea and Chicken Stew

I love a good stew. And I love Indian spices. The pairing of these two loves made dinner tonight: a hearty, healthy, spicy, rustic stew perfect for a cold winter's night. This recipe was inspired by a recipe from Ali Segersten's The Whole Life Nutrition Cookbook. This has become one of my absolute favorite cookbooks. I adore the creativity in each featured recipe. I find myself scanning this book every afternoon, looking that night's dinner recipe. And I've been so pleased with everything I have tried from her cookbook thus far. I usually end up tweaking a few things from her recipes to make them my own (as is the case with this recipe), but I have to give her due credit for the inspiration!

This stew was so good it surprised me. The dried fruit really sweetens this spicy pot of stew up like a dream. It's packed with antioxidants and cancer-fighting properties, thanks to the assortment of spices and veggies alike. It's a great meal to make if anyone in your house is fighting the cold so persistent in these winter months.

And it makes quite a large pot! Plan on enjoying this with your family and friends.


Indian Spiced Chickpea and Chicken Stew

1 tablespoon coconut oil
1 large yellow onion
4 cloves garlic
2 carrots
2 medium sized sweet potatoes
1 1/2 teaspoons garam masala
1 1/2 teaspoons curry powder
pinch cayenne pepper
pinch salt and black pepper
2 cups cooked chickpeas
1 14 oz. can tomato sauce
1 cup chicken broth
1 cup cooked, shredded chicken
1/2 cup assorted dried fruit (I used a combination of dried figs, prunes, and raisins equal to a 1/2 cup total)
1/4 cup chopped parsley

In a large soup pot, heat coconut oil over medium to low heat. Chop onion and add to pan. Cook 3-5 minutes, until translucent. Mince garlic and chop carrots and sweet potatoes into bite size pieces. Add to pan along with spices (through black pepper). Cook another few minutes. Add remaining ingredients to the pot (except parsley) and stir.

Bring to a boil. Lower heat to a simmer, cover, and cook for 20-25 minutes, until vegetables are tender. Ladle into bowls and sprinkle with parsley.

Thursday, January 26, 2012

Blueberry Scones (gluten, dairy, and sugar free)

If you follow this blog at all, you'll have realized by now that I have this thing for scones... I love them. I adore them. I (often) dream about them... the crisp, crumbly, fall-apart-in-your-mouth feeling you get when you eat them. Scones define good coffee house atmosphere for me. Unfortunately, though, there aren't any coffee houses that I can go to to order a scone with my coffee, because coffee house scones are never gluten free (at least not the coffee houses I have been to). Hopefully this will change in the future as more and more restaurants and coffee shops are realizing the huge impact that gluten intolerance and gluten sensitivities is having on our population.

Thankfully, I love eating at home, and cooking and baking my own food. Therefore I can make gluten free scones anytime I want.

Last night the scone urge hit me again, so I started browsing the internet for a new recipe to try. I stumbled upon Jennifer Esposito's website, Jennifer's Way, where she has a host of great gluten free recipes and information in general on Celiac disease and gluten intolerance. I tried out her scone recipe, making a few changes along the way. I am really happy with the results. I know I say this way too much, but these might quite possibly be my favorite scones to date. If you like rustic scones that are just a tad sweet, I think they'll become your favorite too.


Blueberry Scones (gluten, dairy, and sugar free)

Dry ingredients:

1/2 cup brown rice flour
1/2 cup sorghum flour
1/2 coconut flour
1/2 tapioca flour
2 teaspoons baking powder
1 teaspoon baking soda
1 teaspoon cinnamon
3/4 teaspoons xanthan gum
pinch salt

Wet ingredients:

1/3 cup almond milk
1/3 cup applesauce
1/4 cup GF brown rice syrup
1/2 cup ripe mashed banana
2 tablespoons coconut oil, liquified
1 teaspoon vanilla
10 drops liquid stevia
1/2 cup blueberries (can be fresh or frozen; I used frozen)

1 tablespoon xylitol, optional

Preheat oven to 425 degrees. Line a large baking sheet with parchment paper.

Mix all dry ingredients in a large bowl. Whisk all wet ingredients (except blueberries) in a separate bowl. Add wet ingredients to dry and stir to combine. Add blueberries and gently stir again until a dough ball forms (you may have to use your hands).

Place dough ball onto prepared baking sheet and form into a large oval, about 1/2 inch thick. Sprinkle with xylitol. With a wet knife, score scone dough into desired shape (I cut mine crosswise four ways to make 16 scones).

Bake 18 minutes. Remove and cut all the way through the scored dough to separate the scones, so that all sides of each scone are exposed. Put back in the oven for an additional 5 minutes to crisp up all sides of the scones.


Tuesday, January 10, 2012

Brown Rice and Lentil Curry Salad

It must be the fact that I'm lactating, because never in my life have I been craving brown rice and lentils like I am right now. I created this salad a few weeks ago and have made it at least three times already, enjoying it for days on end. It just hits the spot, every time.

(My baby must like me eating it too, because he is just such a good baby.)


I think our bodies have a way of telling us what to eat by our cravings. And this particular craving is so darn healthy that I have no problem indulging (well, it feels like indulging to me) in it at each whim. Thanks to the lentils, it is full of protein, another thing that both pregnant and lactating women need in abundance in this stage of life.

Brown Rice and Lentil Curry Salad


1 cup long grain brown rice, uncooked
1 cup brown or green lentils, uncooked
4 cups water or chicken stock
1 medium or 1/2 large butternut squash
2 tablespoons extra virgin olive oil
2 cups lightly packed spinach
1/2 cup raisins
3/4 cup curry vinaigrette

Preheat oven to 400 degrees. Line a large baking sheet with parchment paper. Peel and cube butternut squash into bite size pieces. Place on prepared baking sheet and drizzle with olive oil. Roast in the oven for approximately 30-40 minutes, until fork tender.

In two separate medium sized saucepans, heat 2 cups of water or stock in each. Add brown rice to one pan and lentils to the other. Bring both to a bowl, then reduce heat to low and cover. Cook the brown rice for approximately 40 minutes, until all liquid is absorbed. Cook the lentils for approximately 25-30 minutes (ok if not all the liquid is absorbed).

Drain lentils and place in a large bowl. Add cooked brown rice, roasted squash, spinach, and raisins to lentils. Pour vinaigrette over brown rice mixture and stir to combine.

Enjoy right away warm or refrigerate and enjoy cold.


Tuesday, November 1, 2011

Pumpkin Granola (gluten free)


I'm a sucker for anything pumpkin right now. And anything snackie. I decided to combine these two elements in my latest kitchen creation for a granola full of the flavors of fall. Perfect for breakfast or snacks, this addictive granola will have you giddy at the first bite (at least this is the reaction I got from my kids).

Although oats themselves have quite a bit of protein and fiber, I always like to up the ante of these super important nutritional aspects by adding in some nuts and seeds. I also like the use of maple syrup in here verses agave, as maple syrup combines so well with the pumpkin flavor. Of course, if you don't have any maple syrup on hand, agave would be a suitable substitute. A note about maple syrup: always make sure you buy 100% real maple syrup, and don't be afraid to buy Grade B- it's cheaper and I think it has a better flavor.

And I'm happy to report that Trader Joe's now carries a 2 lb. bag of certified gluten free oats for only $3.98! This saves a bit over the Bob's Red Mill brand of certified gluten free oats, ranging from $5.25 to $6.75 per 2 lb. bag. This is great news for a frugal gal like me.

Pumpkin Granola

Dry ingredients:
4 cups gluten free rolled oats
1/2 cup chopped almonds
1/2 cup pumpkin and/or sunflower seeds (or a combo of both)
1/2 cup Xylosweet (xylitol) or coconut palm sugar
1/2 cup raisins
1/2 cup dried cranberries
1/4 cup shredded coconut
1 tablespoon chia and/or flax seeds
pinch salt
1 1/2 teaspoons pumpkin pie spice (or 1 teaspoon cinnamon, 1/4 teaspoon nutmeg, and 1/4 teaspoon ginger)

Wet ingredients:
3/4 cup pumpkin puree
1/4 cup maple syrup
2 tablespoons coconut oil, liquified
1 teaspoon vanilla extract
10 drops liquid stevia

Preheat oven to 350 degrees. Line two large baking sheets with parchment paper.

Combine dry ingredients in a large bowl and stir to combine. Combine wet ingredients in a smaller bowl and whisk to combine. Add wet ingredients to dry and, using a large spatula, stir a few times to make sure all dry ingredients are evenly coated.

Pour granola evenly between the two prepared baking sheets and, using the spatula, spread granola out to a single layer on each baking sheet.

Bake for 20 minutes. Stir granola. Bake for an additional 20 minutes. Eat immediately or let cool on wire racks until completely cooled (at least an hour) before storing in an airtight container.


Monday, October 3, 2011

Cinnamon Caramel Apple Dip


New addiction alert!!! Raw caramel apple dip for all of those wonderfully tart and sweet apples in season right now. Funny thing is, the ingredients in this recipe resemble nothing of the typical caramel dip you find in stores, which are full of sugar and nothing else (and often times it's not even real sugar). This recipe, however, is actually good for you. Who knew that you could eat your caramel apple dip and get your protein too? Well, this is proof that you can (thanks to my friend the cashew).

I found this recipe on one of my favorite blogger's site, The Whole Life Nutrition Kitchen. Ali posted it about a year ago, and I've been waiting in anticipation for apple season this year to make it. It is divine, to say the least. Creamy, smooth, sweet... the apple's perfect dipping companion. I changed Ali's recipe up slightly: adding cinnamon, decreasing the amount of maple syrup and adding in a few drops of liquid stevia instead. I also found that I need to use the date soaking water to get this dip to the perfect creamy consistency.

My favorite way to inhale (I mean... enjoy this) is with sliced, raw apples, but it is also delicious as a dip for crackers, pears, or carrots, or as a spread for bread or icing for cinnamon roles. Or maybe you'll just want to eat it plain, right from the spoon!

Just to let you know how good it is, I've already made five batches of this in two weeks. :)


Cinnamon Caramel Apple Dip

1 cup raw cashews
1 cup dates
2-3 tablespoons maple syrup
1 teaspoon vanilla
1 teaspoon cinnamon
5 drops liquid stevia
pinch salt

Soak cashews in water for 2-3 hours. Soak dates separately in about 1 cup of water for 2- 3 hours (save date soaking water).

Drain cashews and put in a Vitamix or high powered blender. Remove dates from soaking water and add to cashews, along with remaining ingredients. Turn blender on low speed and slowly increase speed as ingredients come together to form a smooth consistency, adding a few tablespoons of date soaking water at a time to keep mixture flowing smoothly. Once it is flowing, run the Vitamix on high for 10 or so seconds.

Thursday, September 15, 2011

Simple Bread (gluten, grain, and dairy free)


My inspiration for this recipe comes yet again from Elana. Gosh, I love her. Her recipes are so simple and always delicious. Since the weather has cooled, my yearning to bake has come alive. And today I just needed a really good, gluten free bread. Everyone in our house has been eating a lot of toast lately (organic, yes, but filled with gluten no less), so I've been feeling a bit left out. This morning I sought to change that by making a gluten free bread that I can indulge in just like the rest of 'em.

I used Elana's Bread 2.0 recipe as a guide, but since she bakes hers in the Magic Loaf 7.5x3.5" pan and mine is currently packed away in the storage unit, I only had access to an 8x4" pan, which means I needed to increase a few ingredient proportions to make sure this bread did not come out of the pan completely flat. I also added some extra virgin olive oil to make this bread a little more savory and moist. I am very happy with the results! My kids seemed to gobble this up too, always a sure-fire sign that a recipe is blog-worthy. I love how the top of this bread gets nice and brown, slightly crunchy to the touch, giving it a rustic, comfort food feel.

Since I've had this bread at least three different times throughout the day, I've had ample opportunities to top it off with various twists: butter and honey, jam, plain, and almond butter. Elana recommends spreading it with goat cheese, which sounds divine. You can eat it for your morning toast, make a nice sandwich out of it for lunch, or serve it alongside some soup for dinner (we ate it with our Thai Coconut Chicken Soup tonight). Very versatile, very healthy, very high in protein and fiber; simply a bread you can eat and feel really good about.


Simple Bread

Dry ingredients:
1 3/4 cups almond flour
3/4 cups arrowroot powder
1/4 cup ground flaxseed
3/4 teaspoon baking soda
pinch salt

Wet ingredients:
5 eggs
1 tablespoon extra virgin olive oil (EVOO)
1 teaspoon apple cider vinegar (ACV)
1 teaspoon agave or honey

Preheat oven to 350 degrees. Grease an 8x4 inch loaf pan with olive or coconut oil.

Mix dry ingredients in a bowl. In a separate bowl, whisk eggs, EVOO, ACV, and agave. Add wet ingredients to dry and stir to combine.

Pour mixture into prepared loaf pan and bake 40 minutes. Remove from oven and cool on a wire rack. Use a small silicone spatula to remove from pan. Slice and serve.

Friday, September 9, 2011

Coconut Chocolate Chip Granola Bars

This recipe came to me from one of my girlfriends who makes a version of these that looks divine, but unfortunately for me, is not gluten free. So I've had to adapt the recipe to fit my gluten and sugar free dietary needs. And let me tell you, these granola bars take the cake! They are so delicious!

My first batch of these were devoured for breakfasts and snacks by my family, very quickly, proving their addictiveness. Although the list of ingredients seems a little long, this recipe does, in fact, come together very quickly.

So the next time you're craving one of those packaged granola bars for a quick breakfast or snack, try whipping up a batch of these instead. In this case for sure, homemade trumps store bought by a long shot.


Coconut Chocolate Chip Granola Bars

Dry Ingredients:
2 cups certified gluten free rolled oats
1 cup almond flour
1/2 cup ground flaxseed
1/2 cup shredded coconut
1/2 cup coconut palm sugar
1/2 cup raisins, dried cherries, or dried cranberries
1/2 cup dark chocolate chips
1 tablespoon cinnamon
pinch salt

Wet Ingredients:
1 egg
1/2 cup raw honey or maple syrup
1/2 cup coconut oil, liquified
2 teaspoons vanilla extract

Preheat oven to 350 degrees. Grease a 9x13 inch pan with coconut oil.

Combine dry ingredients in a large bowl. In a small bowl, whisk egg and add remaining wet ingredients. Continue whisking until combined. Add wet ingredients to dry and stir thoroughly. Pour into prepared baking dish.

Bake for 30 minutes. Remove from oven, cool for 5 minutes, then cut into bars. Let set another 30 or more minutes before indulging.

Makes 16-24 bars (depending on your size preference).

Sunday, August 21, 2011

Eggplant Panzanella (gluten free, dairy free)

It's been a frustrating year of growing vegetables in my backyard. First, the weather has been quite A typical of a normal Minnesota summer. Lots of storms, lots of heat, lots of humidity, and all very early on in the season. Then there were the rabbits. And then there were (and still are) the Japanese Beetles. Oh boy. With that combination of farming nightmares (at least farming in my own little urban garden), I have only three out of my nine crops planted left: eggplant, peppers, and a very small portion of kale. All of my other plants had to be uprooted last week. It was very sad, especially when you think of the time, money, and patience put into the growing process. Thankfully, this is the first year we decided to sign up for a CSA (Community Supported Agriculture), so despite my lack of backyard produce, we have not been short of fresh and local veggies.

That being said, my eggplant not only survived the harshness of the season, it has flourished. And now I have a ton of it. That, combined with the zucchini and summer squash from my CSA, has pretty much filled up my crisper drawer. Time to put those fresh veggies to good use.

I've never been a "bread" salad kind of girl, especially after giving up gluten. However, I was watching an episode of Kelsey Nixon's Kelsey's Essentials recently during my workout, and she had an inspiring recipe for a fresh panzanella salad that looked divine. And as luck would have it, I just so happened to have a bag of gluten free bread chunks in my freezer just waiting to be used up. So I came up with a version of the panzanella salad, gluten free style. And now that I know how easy and delicious it is to make this (and gluten free no less), it will be a staple in my house this time of year when those veggies come knocking on my crisper door.


Eggplant Panzanella (gluten free, dairy free)

Panzanella:
1 medium eggplant
1 medium zucchini
1 small summer squash
1 green pepper
1 14 oz. can diced tomatoes (or 2 medium fresh tomatoes)
2 tablespoons extra virgin olive oil
salt, pepper

6 cups gluten free bread chunks or crumbs (I get a bag of GF bread chunks in the freezer section of my local coop)
2 cloves garlic
2 tablespoons extra virgin olive oil

Dressing:
1/4 cup red wine vinegar
1 tablespoon dijon mustard
salt, pepper
1/2 cup extra virgin olive oil

Preheat oven to 400 degrees. Line two large baking sheets with parchment paper.

Chop eggplant, zucchini, squash, and pepper into large bite size chunks and place in a large bowl. Drain juice from can of tomatoes, or if using fresh tomatoes, chop into large chunks and add to bowl. Drizzle veggies with oil and salt and pepper to taste (about 1/2 to 1 teaspoon each). Stir to combine. Spread in a single layer onto one of the prepared baking sheets. Bake 20 minutes in preheated oven.

Meanwhile, spread bread chunks evenly onto the other prepared baking sheet. Grate garlic cloves over bread and drizzle with oil. Bake for 6-8 minutes, during last part of baking time for the veggies.

Remove both pans from oven. Place bread chunks in a large bowl to stop from browning further. Let veggies cool on pan for 30 minutes to 1 hour. Then add to bowl with bread chunks.

For the dressing, add vinegar, mustard, and a pinch of both salt and pepper to a small mixing bowl. Whisk in oil in a steady stream until emulsified. Pour dressing over bread salad. Stir to combine.

This salad can be served immediately, but flavors deepen if allowed to rest at room temperature for 30 minutes to 1 hour.

Thursday, August 11, 2011

Minute Steaks in Garlic Tomato Sauce


Ahh, the minute steak. The seemingly last cut of meat to get cooked out of my bulk purchase of 30 lbs. of grass fed beef from our local beef farmer. What to do with these guys? I am always asking myself. Usually I make chicken fried steak out of the minute steak, but the other night I wanted something different. Something juicy. Something comforting.

In my online research about the best ways to cook this often neglected cut of meat, I found that it really should be slow cooked in some form of acid to get it to a tender state. After some thought, I realized I haven't made a lot of tomato-based dishes lately, so that became my cooking-acid of choice. It worked out fabulously! My four year old told me the house smelled "delicious" while this was cooking on the stove, "just like a restaurant," (a sure sign that I've hit the mark on dinner).

In fact, it was so good, I raved to my husband about this dish (he unfortunately missed this manly meat-and-potatoes meal due to some work deadlines), and I'm not one to rave about steaks in general, let alone minute steaks. So I knew it had to make an appearance on the 18 Hour Kitchen as this will definitely be one recipe I'll keep coming back to when our next round of beef is scheduled for delivery and those minute steaks need to get used up quick!


Minute Steaks in Garlic Tomato Sauce

2 tablespoons coconut oil
1 medium onion
4 cloves garlic
1 lb. minute steaks (about three 1/3 lb. steaks)
1/4 cup all purpose gluten free flour blend
1 14 oz. can chopped tomatoes
1 tablespoon dried oregano
salt, pepper

Heat oil in a large saucepan over medium-low heat. Chop onion and add to pan. Cook about 3-4 minutes until translucent.

Meanwhile, rough chop garlic and dredge steaks on both sides in GF flour, shaking off excess flour. Add steaks to pan and spread garlic around steaks in pan. Cook steaks 3-4 minutes per side, until browned.

Next pour the whole can of tomatoes over the steaks in pan (including juice). Sprinkle oregano over tomatoes and add a few shakes of salt and pepper. Stir to evenly distribute sauce over and around steaks.

Bring to a gentle boil, then turn heat down to low, cover, and cook an additional 20 minutes, until steaks are tender. Serve steaks topped with garlic tomato sauce.

This dish pairs wonderfully with garlic mashed potatoes and steamed broccoli.

Monday, July 11, 2011

Curry Vinaigrette

This recipe was inspired by a recipe from my friend's CSA newsletter. She made their version of it and served it over mixed greens one night when we were over for dinner, and my husband and I could not stop raving about it. I came home and knew I had to come up with a curry vinaigrette recipe of my own. I am a curry lover, and if you are like me, you will swear by this vinaigrette. It's become my new favorite; I love it so much I've dubbed it "the liquid gold." 

I'm into super simple mixed green salads these days as a product of our extremely hot weather, so that is how I've been using this dressing the most. However, I also think it would be delicious drizzled over some steamed kale or grilled veggies. 

Curry is such healthy a spice to add into your lifestyle. The turmeric is what makes it that beautiful yellow-gold color and it is beneficial for preventing cancer and is healthful in so many other ways!


Curry Vinaigrette

1 tablespoon dijon mustard
1 tablespoon honey (preferably raw)
1/2 tablespoon curry powder
salt, pepper
1/4 cup apple cider vinegar
2/3 cup extra virgin olive oil

Add dijon mustard through apple cider vinegar in a small bowl and whisk to combine. While continuing to whisk, slowly stream in the olive oil until emulsified.

Serve over mixed greens or over any steamed or grilled veggies.

Wednesday, June 15, 2011

Herb & Olive Quinoa (gluten free, sugar free, dairy free)

Doesn't this dish just look happy? Like a quinoa confetti of sorts. It's such a great dish to serve in the summer because it tastes great at room temperature and does not need to be refrigerated. Not to mention (as I do in all of my posts about quinoa), it has amazing health benefits. The protein and amino acids alone! I love it because it is so full of protein and yet so light on the tummy. I always end up going back for seconds.

This dish is super versatile. Use any kind of olives and herbs you have on hand. For the herbs, I just plucked a variety from my new garden. I really like the purple basil in here because provides a beautiful contrast in color from the green of the other herbs. I purposely made this dairy free, but I think a handful of feta cheese would also be tasty.

Herb & Olive Quinoa

1 tablespoon extra virgin olive oil
1 small yellow onion
1 garlic clove
1 1/2 cups quinoa
2 1/4 cups water
pinch salt
1 cup mixed green and kalamata olives, chopped
1 cup loosely packed mixed herbs (I used green and purple basil, cilantro, and mint), chopped
1/2 toasted almond slivers or chopped almonds

Heat olive oil in a medium saucepan over med-low heat. Chop onion and garlic and add to pan. Cook for 3-5 minutes, until onions are translucent. Add quinoa and cook and additional minute. Add water, bring quinoa to a boil, then cover and reduce heat to low. Cook 15-20 minutes until water is absorbed.

Once quinoa has cooked, transfer to a serving bowl and add olives, herbs, and toasted almonds. Toss to coat.

Serve immediately or at room temperature.

Wednesday, May 18, 2011

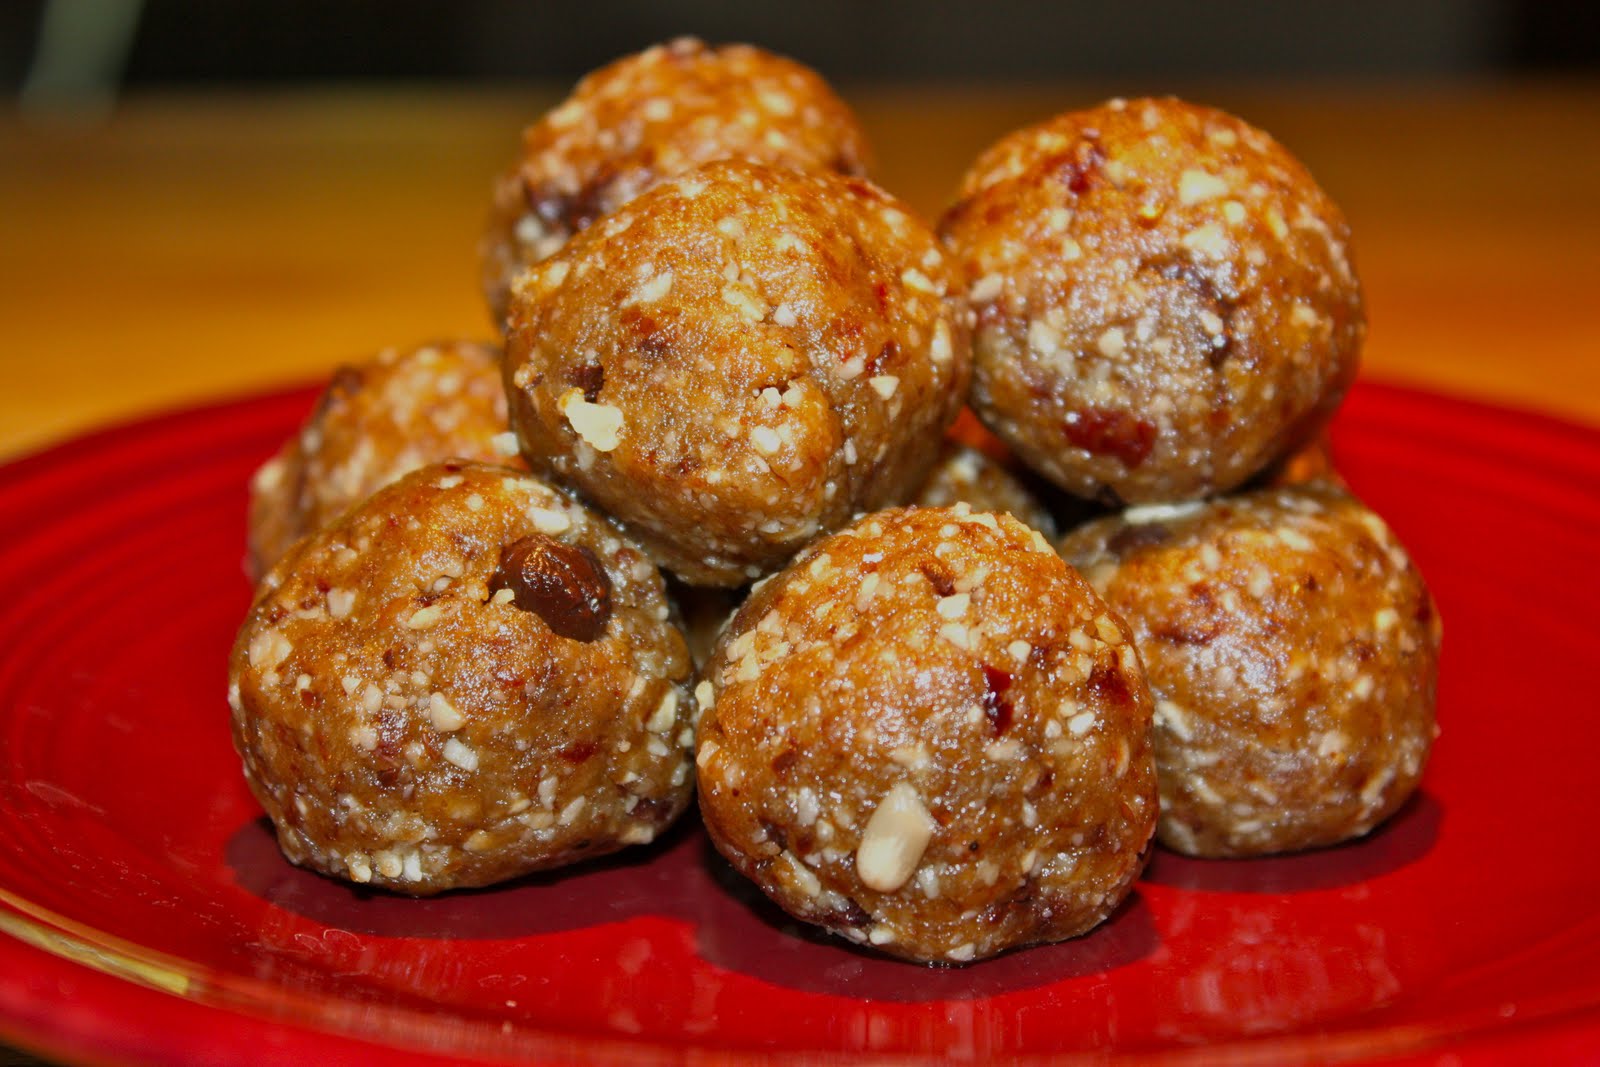
Chocolate Cherry Power Bites (gluten free, sugar free, dairy free, raw)

I have been in love with Larabars every since my raw food days. Simple ingredients, sweet- yes (thanks to the dates), but packed with protein and fiber. I keep a Larabar in my purse at all times in case of a hunger emergency. The only problem with Larabars is the cost. At most grocery stores, they retail for about $1.29 per bar, although I can frequently find them on sale for around $1.00 (at which times I purchase about 20 to stock up!). Nonetheless, I've been on a mission to create my own, homemade version of the Larabar. I knew it must be an easy recipe to re-create, with the list of ingredients so few and no baking required. Then all of a sudden, bloggers started posting recipes for their own versions, and came up with names ranging from energy bars, power bars, power balls, superfood bars, etc... Elana has posted quite a few in the last month or so (she's often a source of gluten free inspiration for me), an I've taken queues from this version in creating mine. And when she says they taste like cookie dough, she's right!

I've made so many batches of these, changing up the ingredients slightly each time, and this version is one of my favorites. I love the sunflower seeds in here. It almost gives these little guys a peanut-y taste (without the peanuts). I don't know how long they last in the fridge (I assume it would be a week or two) because we eat them all within two days... :)

So simple to make- it literally takes about five minutes- you have no excuse for not having an energy food on hand when you need it most (at about three o'clock for me!). Also makes a great pre-workout snack!


Chocolate Cherry Power Bites

1 cup Medjool dates (about 8), pitted
1 1/2 cups walnuts
1/2 cup sunflower seeds
pinch salt
1/2 tablespoon vanilla
2 tablespoons dark chocolate chips
2 tablespoons dried cherries

Place dates, walnuts, sunflower seeds, salt, and vanilla in a food processor and process for about a minute, until a course meal consistency is reached. Stop processor and add chocolate chips and cherries. Pulse for about 30 more seconds, until chocolate and cherries are coarsely chopped and integrated into the batter. Using a spoon, scoop about 1 tablespoon of mixture into your hands and form into balls. Repeat with remaining batter. Freeze for about 30 minutes, then store power bites in the fridge.

Makes about 18 power bites.

Friday, April 22, 2011

Banana Chocolate Pudding Pie (with Avocado)

As I mentioned in an earlier post, last week I made a version of Kelly the Spunky Coconut's Banana Chocolate Cream Pie. And is it ever good! Free of grains, sugar, and dairy, it feels so much more like a super food or power food than dessert. Truly, you can feel completely guilt-free eating this. It's light, not heavy at all, which I like in dessert-like food. Although the list of ingredients is lengthy, I believe the end result is well worth the effort of gathering them all for this recipe. I've been shaving off slices of this a few times a day... for me and my baby (well, he's not really a baby anymore, he's 16 months now, but he's my baby!). I actually love feeding this to him because he's getting doses of fruits and veggies and protein in every bite, and he thinks it's dessert!

This would also be a good dessert to serve at your Easter gathering. I mean, who doesn't love chocolate? And after a meal that's probably a bit more heavy than usual (as holiday meals tend to be), a light and delicious pudding-like pie is just the ticket to get everyone in the mood to hunt for Easter eggs (that is if you participate is such pagan festivities, right Dad?). Well, whatever it is you do on Easter, be it hunt for Easter eggs or just simply go to church and get together with family, this dessert is a great choice.

Banana Chocolate Pudding Pie (with Avocado)


Crust:

1 cup walnuts
1/2 cup almond flour
1 tablespoon flax
1 teaspoon baking soda
1 teaspoon baking powder
1/4 cup unsweetened applesauce
1/4 cup coconut oil, melted

Filling:

2 ripe bananas
1 ripe avocado
5 dates
1/3 cup cocoa powder
1/4 cup coconut oil, melted
10 drops liquid stevia
2 teaspoons chia seeds
1 tablespoon vanilla
1 tablespoon Xylosweet (xylitol)

Preheat oven to 350 degrees.

For the crust, place all ingredients in a food processor and process until coarsely mixed. Press into a 9 inch pie plate and bake for 12 minutes. Remove from oven and let cool completely.

For the filling, place all ingredients in a food processor or blender and process until completely smooth. Pour into cooled pie crust, cover with plastic wrap, and place in refrigerator for a couple of hours before slicing and serving.

Friday, April 15, 2011

Strawberry Scones

We're somewhat regressing in our spring weather here in the north. I woke up today and it was colder than it has been the past few days. And I was just cold. So I needed the oven on, bad. I had a bowl full of beautiful organic strawberries sliced in my fridge and thought they would be delicious baked into scones. So off to scone-ville I went.

I used to eat scones all the time back when I was in college. Daily, in fact. An addiction? Quite possibly. It was my quick breakfast of choice as I was running to my early morning classes. They paired so perfectly with a cup of dark roasted coffee (also an addiction of mine in college). But since going gluten free, those days of grabbing a scone at my local bakery or coffee shop are long gone. Now when I have the craving, I have to indulge myself in my own kitchen. Not a problem, since being in my kitchen in now a new addiction of mine.

If you are not opposed to dairy, I think they would be great topped with either freshly whipped cream or grass-fed butter.

Strawberry Scones (gluten free, sugar free, dairy free)

Dry Ingredients:
1 cup sorghum or almond flour (or a combination of the two)
1/4 cup coconut flour
1/4 tapioca flour
1/2 tablespoon baking powder
1/2 teaspoon xanthan gum
1/4 teaspoon powdered stevia (optional)
pinch salt

Wet ingredients:
1/3 cup coconut oil
1/3 cup non-dairy milk (almond milk, hemp milk, or coconut milk beverage- such as So Delicious)
1/4 cup maple syrup
1 tablespoon vanilla

3/4 cup strawberries, sliced thin
1 tablespoon Xylosweet (xylitol), optional

Preheat oven to 425 degrees. Line a baking sheet with parchment paper.

In a medium bowl, combine all dry ingredients and stir. Add coconut oil (not melted, it's best if it's somewhat solidified) and cut in with a fork or your hands until mixture coarsely crumbles.

In a separate, smaller bowl, combine milk through vanilla and stir. Add to dry ingredients and stir until a soft dough forms. Add strawberries and stir gently (or use your hands) to mix until combined.

Place dough onto prepared baking sheet and, using your hands, press dough into an 8 inch circle. Using a knife, score circle into 8 even wedges. Sprinkle with Xylosweet, if using.

Bake 18-22 minutes, until a soft crust forms on the top of scones. Remove from oven and let rest 5-10 minutes before slicing through scored wedges and serve.

Makes 8 scones.


As I was creating these, I thought they would be perfect for a Sunday morning Easter brunch. Therefore I am submitting these for the Spunky Coconut's Spunky Holiday Easter recipe roundup.