Tuesday, August 14, 2012
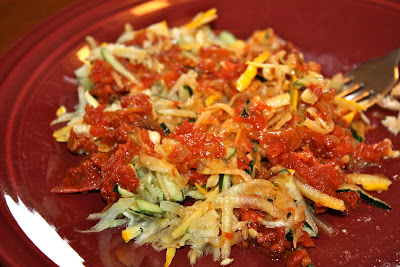
Slow Cooker Marinara from Fresh Tomatoes
If you're wondering what to do with all those tomatoes that are rapidly coming into season, this recipe is for you. I am thrilled at how easy and delicious it is. Very little effort is required and the result is a tantalizing marinara that is unbelievable rich.
The uses for this marinara are plentiful. Serve it over brown rice pasta for a traditional take, or do as I do and serve it over grated zucchini for a take on "raw" pasta. It's also great for topping over chicken, spicy chicken sausage, or fresh white fish. It even makes a great dip for vegetables.
Slow Cooker Marinara from Fresh Tomatoes
18-20 roma tomatoes, washed and quartered
1 medium yellow onion
3-4 garlic cloves
2 tablespoons extra virgin olive oil
1 tablespoon balsamic vinegar
1 tablespoon agave nectar
1 teaspoon dried basil
salt, pepper
Place roma tomatoes in a large slow cooker. Chop onion and mince garlic and add to tomatoes. Drizzle oil, vinegar, and agave over tomatoes. Add seasonings and stir.
Turn on lowest setting and cook for about 4 hours. About halfway through cooking time, mash mixture with a potato masher to break up the tomatoes, then stir before putting the lid back on.
This marinara really cooks down, so if you're feeding a crowd, double the recipe. You can always freeze leftovers.
As a side note, I left my marinara really chunky, the way it gets from mashing with the potato masher. If you like a smoother marinara, by all means take an immersion blender to it or blend in a high powered blender for a bit until it reaches the desired consistency. My husband does not like chunky tomatoes, so if he would have been home for this dinner, I would have pureed it a bit before pouring over zucchini.
Wednesday, August 8, 2012
Zucchini Banana Bread (grain and sugar free)
I am on zucchini overload right now, as it is just flowing in from my CSA like the land of milk and honey. I love the stuff; I've been sautéing it in grass-fed butter, roasting it, grilling it, and of course, using it in zucchini bread. I've made this bread several times now, each time changing up a thing or two to get to the "perfect" consistency. And this is it!
The key to this bread is in wringing out the excess water from the shredded zucchini before adding it to the batter. Otherwise the bread becomes too soggy (although still very good) and harder to cut without it falling apart.
I'm getting back on my high protein/fiber kick, and that is where this recipe really shines. Made exclusively from blanched almond flour, it is a sure fire way of getting the muscle-building protein and digestion-pleasing fiber in, while ditching the grains altogether. And the truly amazing thing about baking with blanched almond flour is that there is no need to add xanthan gum to bind things together. For some reason, it just works without it (something very rare in gluten free baking). Some people have sensitivities to xanthan gum; I personally don't, but if you do, it's just another reason that you will love this recipe.
Zucchini Banana Bread (grain and sugar free)
Dry ingredients:
3 cups blanched almond flour
1/2 cup xylitol
2 heaping teaspoons cinnamon
2 teaspoons baking soda
1/4 teaspoon powdered stevia
pinch salt
Wet ingredients:
4 eggs
1/4 cup milk
2 teaspoons vanilla
1 ripe banana, mashed
2 heaping cups shredded zucchini
Preheat oven to 350 degrees. Lightly spray 4 mini loaf pans with coconut oil cooking spray (I use Pampered Chefs stoneware mini loaf pan).
Mix all dry ingredients in a large bowl. In a separate bowl, whisk the eggs, then add milk, vanilla, and banana and stir. Add wet ingredients to dry and stir to combine.
With a paper towel, wring out the excess water from the shredded zucchini, then add to the batter and lightly stir a few more times to fully incorporate the zucchini.
Pour the batter into prepared loaf pans, lightly spreading the tops of the loafs with the back of a spoon to even out.
Bake for about 50 minutes, or until a toothpick inserted in the middle of the loafs come out clean. Cool in pans for at least 10 minutes before transferring to a wire rack.
The bread can be left out on the counter for the better part of a day, but thereafter wrap the loaves in a paper towel, seal in a ziplock bag, and store in the fridge.
Wednesday, August 1, 2012
Chocolate (Raw Milk) Milkshake
It's been hot, hot, hot here. So we've needed lots of foods that cool our bodies. My Vitamix has been getting a ton of use these days, as I've been whipping up milkshakes in the afternoon for our snacks. This is one of my favorites. It's creamy, smooth, filling, and super refreshing on a hot day. And, as with all of my snacks, contains a hefty dose of protein to keep those little bodies (and Mama's too) satisfied until dinnertime.
Chocolate (Raw Milk) Milkshake
2 cups ice
4 cups raw milk
1/4 cup almond or peanut butter
3 tablespoons cocoa powder
3 tablespoons xylitol (or sweetener of choice)
2 tablespoons chia seeds
1/2 banana
Place all ingredients in the order listed in a Vitamix or other high powered blender. Turn on high for 10-15 seconds, until completely blended. Serve immediately or store in the fridge and add more ice as desired.
Subscribe to:
Comments (Atom)


